
Chapter 3—Basic Flight Maneuvers
Table of Contents
The Four Fundamentals
Effects and Use of the Controls
Feel of the Airplane
Attitude Flying
Integrated Flight Instruction
Straight-and-Level Flight
Trim Control
Level Turns
Climbs and Climbing Turns
Normal Climb
Best Rate of Climb
Best Angle of Climb
Descents and Descending Turns
Partial Power Descent
Descent at Minimum Safe Airspeed
Glides
Pitch and Power

LEVEL TURNS
A turn is made by banking the wings in the direction of the desired turn. A specific angle of bank is selected by the pilot, control pressures applied to achieve the desired bank angle, and appropriate control pressures exerted to maintain the desired bank angle once it is established. [Figure 3-5]
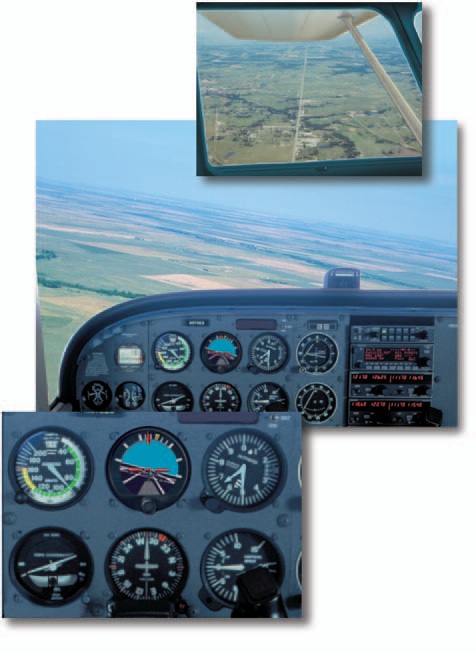
Figure 3-5. Level turn to the left.
All four primary controls are used in close coordination when making turns. Their functions are as follows.
- The ailerons bank the wings and so determine the rate of turn at any given airspeed.
- The elevator moves the nose of the airplane up or down in relation to the pilot, and perpendicular to the wings. Doing that, it both sets the pitch attitude in the turn and “pulls” the nose of the airplane around the turn.
- The throttle provides thrust which may be used for airspeed to tighten the turn.
- The rudder offsets any yaw effects developed by the other controls. The rudder does not turn the airplane. For purposes of this discussion, turns are divided into three classes: shallow turns, medium turns, and steep turns.
- Shallow turns are those in which the bank (less than approximately 20°) is so shallow that the inherent lateral stability of the airplane is acting to level the wings unless some aileron is applied to maintain the bank.
- Medium turns are those resulting from a degree of bank (approximately 20° to 45°) at which the airplane remains at a constant bank.
- Steep turns are those resulting from a degree of bank (45° or more) at which the "overbanking tendency" of an airplane overcomes stability, and the bank increases unless aileron is applied to prevent it.
Changing the direction of the wing’s lift toward one side or the other causes the airplane to be pulled in that direction. [Figure 3-6] Applying coordinated aileron and rudder to bank the airplane in the direction of the desired turn does this.
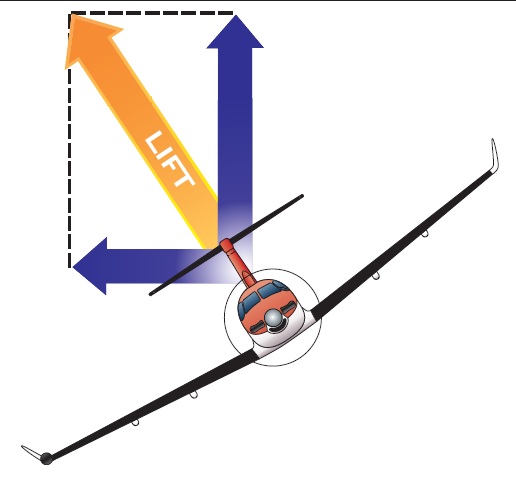
Figure 3-6. Change in lift causes airplane to turn.
When an airplane is flying straight and level, the total lift is acting perpendicular to the wings and to the Earth. As the airplane is banked into a turn, the lift then becomes the resultant of two components. One, the vertical lift component, continues to act perpendicular to the Earth and opposes gravity. Second, the horizontal lift component (centripetal) acts parallel to the Earth’s surface and opposes inertia (apparent centrifugal force). These two lift components act at right angles to each other, causing the resultant total lifting force to act perpendicular to the banked wing of the airplane. It is the horizontal lift component that actually turns the airplane—not the rudder. When applying aileron to bank the airplane, the lowered aileron (on the rising wing) produces a greater drag than the raised aileron (on the lowering wing). [Figure 3-7] This increased aileron yaws the airplane toward the rising wing, or opposite to the direction of turn. To counteract this adverse yawing moment, rudder pressure must be applied simultaneously with aileron in the desired direction of turn. This action is required to produce a coordinated turn.
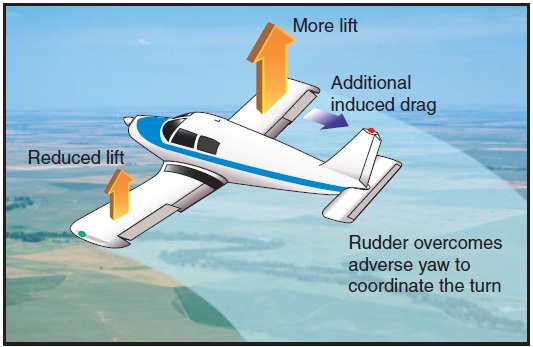
Figure 3-7 Forces during a turn.
After the bank has been established in a medium banked turn, all pressure applied to the aileron may be relaxed. The airplane will remain at the selected bank with no further tendency to yaw since there is no longer a deflection of the ailerons. As a result, pressure may also be relaxed on the rudder pedals, and the rudder allowed to streamline itself with the direction of the slipstream. Rudder pressure maintained after the turn is established will cause the airplane to skid to the outside of the turn. If a definite effort is made to center the rudder rather than let it streamline itself to the turn, it is probable that some opposite rudder pressure will be exerted inadvertently. This will force the airplane to yaw opposite its turning path, causing the airplane to slip to the inside of the turn. The ball in the turn-andslip indicator will be displaced off-center whenever the airplane is skidding or slipping sideways. [Figure 3-8] In proper coordinated flight, there is no skidding or slipping. An essential basic airmanship skill is the ability of the pilot to sense or “feel” any uncoordinated condition (slip or skid) without referring to instrument reference. During this stage of training, the flight instructor should stress the development of this ability and insist on its use to attain perfect coordination in all subsequent training.
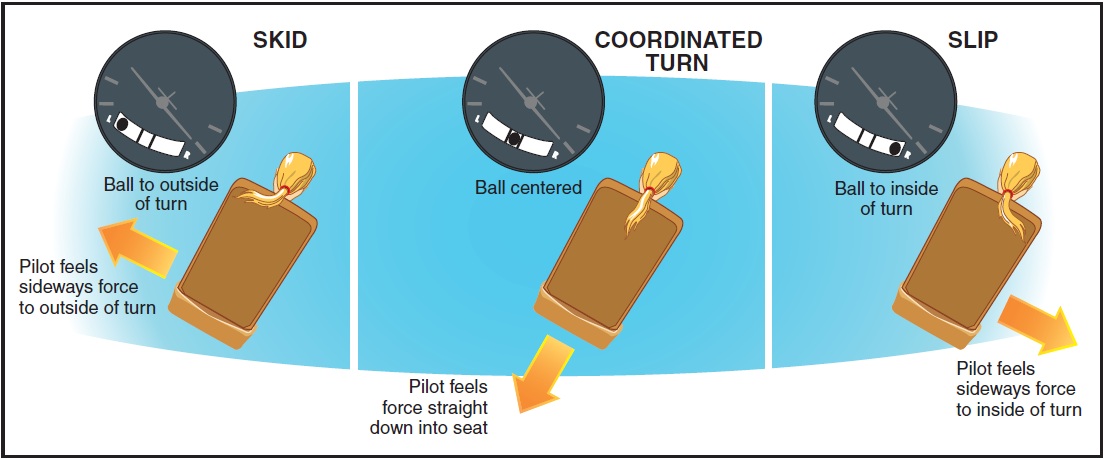
Figure 3-8. Indications of a slip and skid.
In all constant altitude, constant airspeed turns, it is necessary to increase the angle of attack of the wing when rolling into the turn by applying up elevator. This is required because part of the vertical lift has been diverted to horizontal lift. Thus, the total lift must be increased to compensate for this loss.
To stop the turn, the wings are returned to level flight by the coordinated use of the ailerons and rudder applied in the opposite direction. To understand the relationship between airspeed, bank, and radius of turn, it should be noted that the rate of turn at any given true airspeed depends on the horizontal lift component. The horizontal lift component varies in proportion to the amount of bank. Therefore, the rate of turn at a given true airspeed increases as the angle of bank is increased. On the other hand, when a turn is made at a higher true airspeed at a given bank angle, the inertia is greater and the horizontal lift component required for the turn is greater, causing the turning rate to become slower. [Figure 3-9] Therefore, at a given angle of bank, a higher true airspeed will make the radius of turn larger because the airplane will be turning at a slower rate.
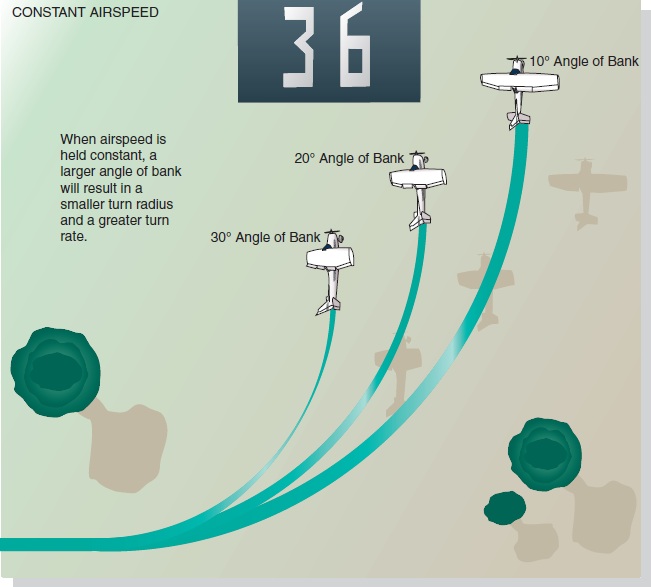
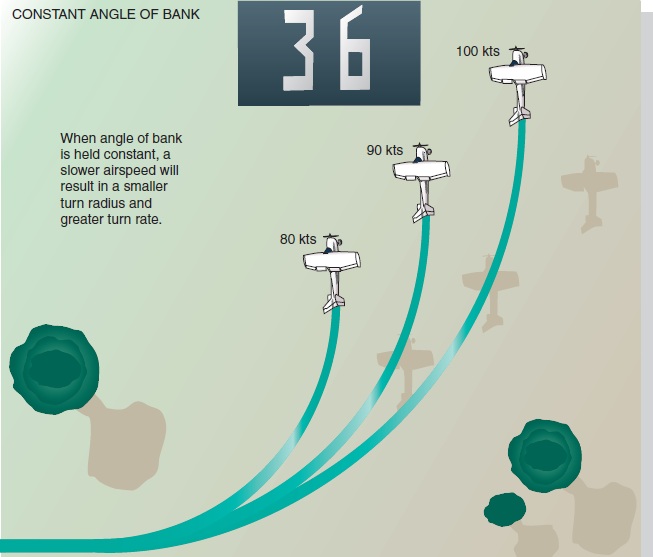
Figure 3-9. Angle of bank and airspeed regulate rate and radius of turn.
When changing from a shallow bank to a medium bank, the airspeed of the wing on the outside of the turn increases in relation to the inside wing as the radius of turn decreases. The additional lift developed because of this increase in speed of the wing balances the inherent lateral stability of the airplane. At any given airspeed, aileron pressure is not required to maintain the bank. If the bank is allowed to increase from a medium to a steep bank, the radius of turn decreases further. The lift of the outside wing causes the bank to steepen and opposite aileron is necessary to keep the bank constant.
As the radius of the turn becomes smaller, a significant difference develops between the speed of the inside wing and the speed of the outside wing. The wing on the outside of the turn travels a longer circuit than the inside wing, yet both complete their respective circuits in the same length of time. Therefore, the outside wing travels faster than the inside wing, and as a result, it develops more lift. This creates an overbanking tendency that must be controlled by the use of the ailerons. [Figure 3-10] Because the outboard wing is developing more lift, it also has more induced drag. This causes a slight slip during steep turns that must be corrected by use of the rudder.
Sometimes during early training in steep turns, the nose may be allowed to get excessively low resulting in a significant loss in altitude. To recover, the pilot should first reduce the angle of bank with coordinated use of the rudder and aileron, then raise the nose of the airplane to level flight with the elevator. If recovery from an excessively nose-low steep bank condition is attempted by use of the elevator only, it will cause a steepening of the bank and could result in overstressing the airplane. Normally, small corrections for pitch during steep turns are accomplished with the elevator, and the bank is held constant with the ailerons.
To establish the desired angle of bank, the pilot should use outside visual reference points, as well as the bank indicator on the attitude indicator.
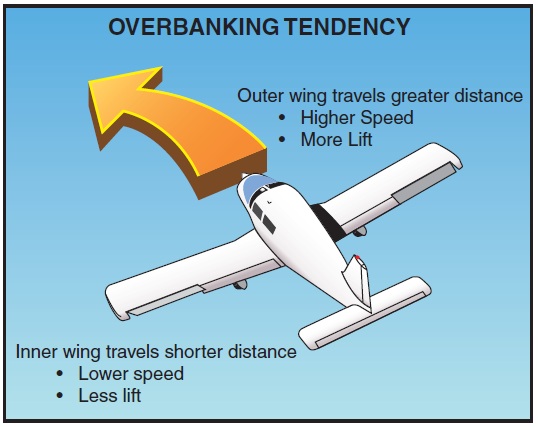
Figure 3-10. Overbanking tendency during a steep turn.
The best outside reference for establishing the degree of bank is the angle formed by the raised wing of low-wing airplanes (the lowered wing of high-wing airplanes) and the horizon, or the angle made by the top of the engine cowling and the horizon. [Figure 3-11 on page 3-11] Since on most light airplanes the engine cowling is fairly flat, its horizontal angle to the horizon will give some indication of the approximate degree of bank. Also, information obtained from the attitude indicator will show the angle of the wing in relation to the horizon. Information from the turn coordinator, however, will not.
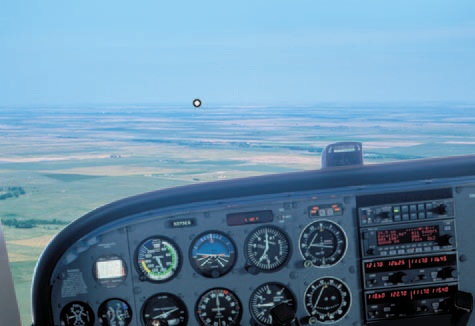
Figure 3-11. Visual reference for angle of bank.
The pilot’s posture while seated in the airplane is very important, particularly during turns. It will affect the interpretation of outside visual references. At the beginning, the student may lean away from the turn in an attempt to remain upright in relation to the ground rather than ride with the airplane. This should be corrected immediately if the student is to properly learn to use visual references. [Figure 3-12]
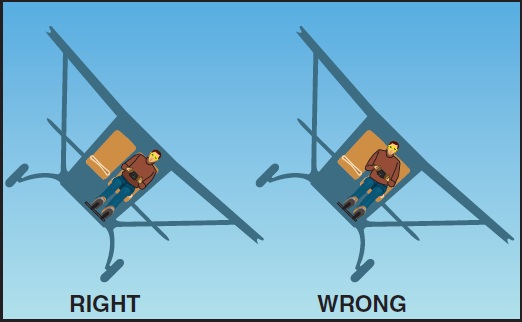
Figure 3-12. Right and wrong posture while seated in the airplane.
Parallax error is common among students and experienced pilots. This error is a characteristic of airplanes that have side-by-side seats because the pilot is seated to one side of the longitudinal axis about which the airplane rolls. This makes the nose appear to rise when making a left turn and to descend when making right turns. [Figure 3-13]
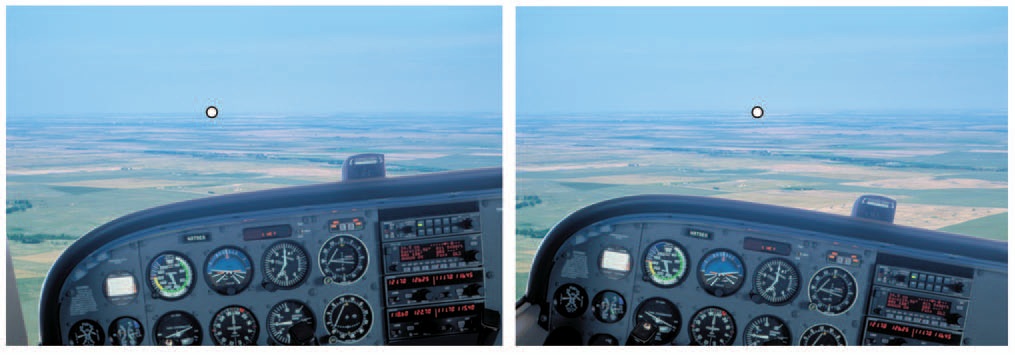
Figure 3-13. Parallax view.
Beginning students should not use large aileron and rudder applications because this produces a rapid roll rate and allows little time for corrections before the desired bank is reached. Slower (small control displacement) roll rates provide more time to make necessary pitch and bank corrections. As soon as the airplane rolls from the wings-level attitude, the nose should also start to move along the horizon, increasing its rate of travel proportionately as the bank is increased.
The following variations provide excellent guides.
- If the nose starts to move before the bank starts, rudder is being applied too soon.
- If the bank starts before the nose starts turning, or the nose moves in the opposite direction, the rudder is being applied too late.
- If the nose moves up or down when entering a bank, excessive or insufficient up elevator is being applied.
As the desired angle of bank is established, aileron and rudder pressures should be relaxed. This will stop the bank from increasing because the aileron and rudder control surfaces will be neutral in their streamlined position. The up-elevator pressure should not be relaxed, but should be held constant to maintain a constant altitude. Throughout the turn, the pilot should cross-check the airspeed indicator, and if the airspeed has decreased more than 5 knots, additional power should be used. The cross-check should also include outside references, altimeter, and vertical speed indicator (VSI), which can help determine whether or not the pitch attitude is correct. If gaining or losing altitude, the pitch attitude should be adjusted in relation to the horizon, and then the altimeter and VSI rechecked to determine if altitude is being maintained.
During all turns, the ailerons, rudder, and elevator are used to correct minor variations in pitch and bank just as they are in straight-and-level flight.
The rollout from a turn is similar to the roll-in except the flight controls are applied in the opposite direction. Aileron and rudder are applied in the direction of the rollout or toward the high wing. As the angle of bank decreases, the elevator pressure should be relaxed as necessary to maintain altitude.
Since the airplane will continue turning as long as there is any bank, the rollout must be started before reaching the desired heading. The amount of lead required to roll out on the desired heading will depend on the degree of bank used in the turn. Normally, the lead is one-half the degrees of bank. For example, if the bank is 30°, lead the rollout by 15°. As the wings become level, the control pressures should be smoothly relaxed so that the controls are neutralized as the airplane returns to straight-andlevel flight. As the rollout is being completed, attention should be given to outside visual references, as well as the attitude and heading indicators to determine that the wings are being leveled and the turn stopped.
Instruction in level turns should begin with medium turns, so that the student has an opportunity to grasp the fundamentals of turning flight without having to deal with overbanking tendency, or the inherent stability of the airplane attempting to level the wings. The instructor should not ask the student to roll the airplane from bank to bank, but to change its attitude from level to bank, bank to level, and so on with a slight pause at the termination of each phase. This pause allows the airplane to free itself from the effects of any misuse of the controls and assures a correct start for the next turn. During these exercises, the idea of control forces, rather than movement, should be emphasized by pointing out the resistance of the controls to varying forces applied to them. The beginning student should be encouraged to use the rudder freely. Skidding in this phase indicates positive control use, and may be easily corrected later. The use of too little rudder, or rudder use in the wrong direction at this stage of training, on the other hand, indicates a lack of proper conception of coordination.
In practicing turns, the action of the airplane’s nose will show any error in coordination of the controls. Often, during the entry or recovery from a bank, the nose will describe a vertical arc above or below the horizon, and then remain in proper position after the bank is established. This is the result of lack of timing and coordination of forces on the elevator and rudder controls during the entry and recovery. It indicates that the student has a knowledge of correct turns, but that entry and recovery techniques are in error.
Because the elevator and ailerons are on one control, and pressures on both are executed simultaneously, the beginning pilot is often apt to continue pressure on one of these unintentionally when force on the other only is intended. This is particularly true in left-hand turns, because the position of the hands makes correct movements slightly awkward at first. This is sometimes responsible for the habit of climbing slightly in right-hand turns and diving slightly in left-hand turns. This results from many factors, including the unequal rudder pressures required to the right and to the left when turning, due to the torque effect.
The tendency to climb in right-hand turns and descend in left-hand turns is also prevalent in airplanes having side-by-side cockpit seating. In this case, it is due to the pilot’s being seated to one side of the longitudinal axis about which the airplane rolls. This makes the nose appear to rise during a correctly executed left turn and to descend during a correctly executed right turn. An attempt to keep the nose on the same apparent level will cause climbing in right turns and diving in left turns.
Excellent coordination and timing of all the controls in turning requires much practice. It is essential that this coordination be developed, because it is the very basis of this fundamental flight maneuver.
If the body is properly relaxed, it will act as a pendulum and may be swayed by any force acting on it. During a skid, it will be swayed away from the turn, and during a slip, toward the inside of the turn. The same effects will be noted in tendencies to slide on the seat. As the “feel” of flying develops, the properly directed student will become highly sensitive to this last tendency and will be able to detect the presence of, or even the approach of, a slip or skid long before any other indication is present.
Common errors in the performance of level turns are:
- Failure to adequately clear the area before beginning the turn.
- Attempting to execute the turn solely by instrument reference.
- Attempting to sit up straight, in relation to the ground, during a turn, rather than riding with the airplane.
- Insufficient feel for the airplane as evidenced by the inability to detect slips/skids without reference to flight instruments.
- Attempting to maintain a constant bank angle by referencing the “cant” of the airplane’s nose.
- Fixating on the nose reference while excluding wingtip reference.
- “Ground shyness”—making “flat turns” (skidding) while operating at low altitudes in a conscious or subconscious effort to avoid banking close to the ground.
- Holding rudder in the turn.
- Gaining proficiency in turns in only one direction (usually the left).
- Failure to coordinate the use of throttle with other controls.
- Altitude gain/loss during the turn.
PED Publication